

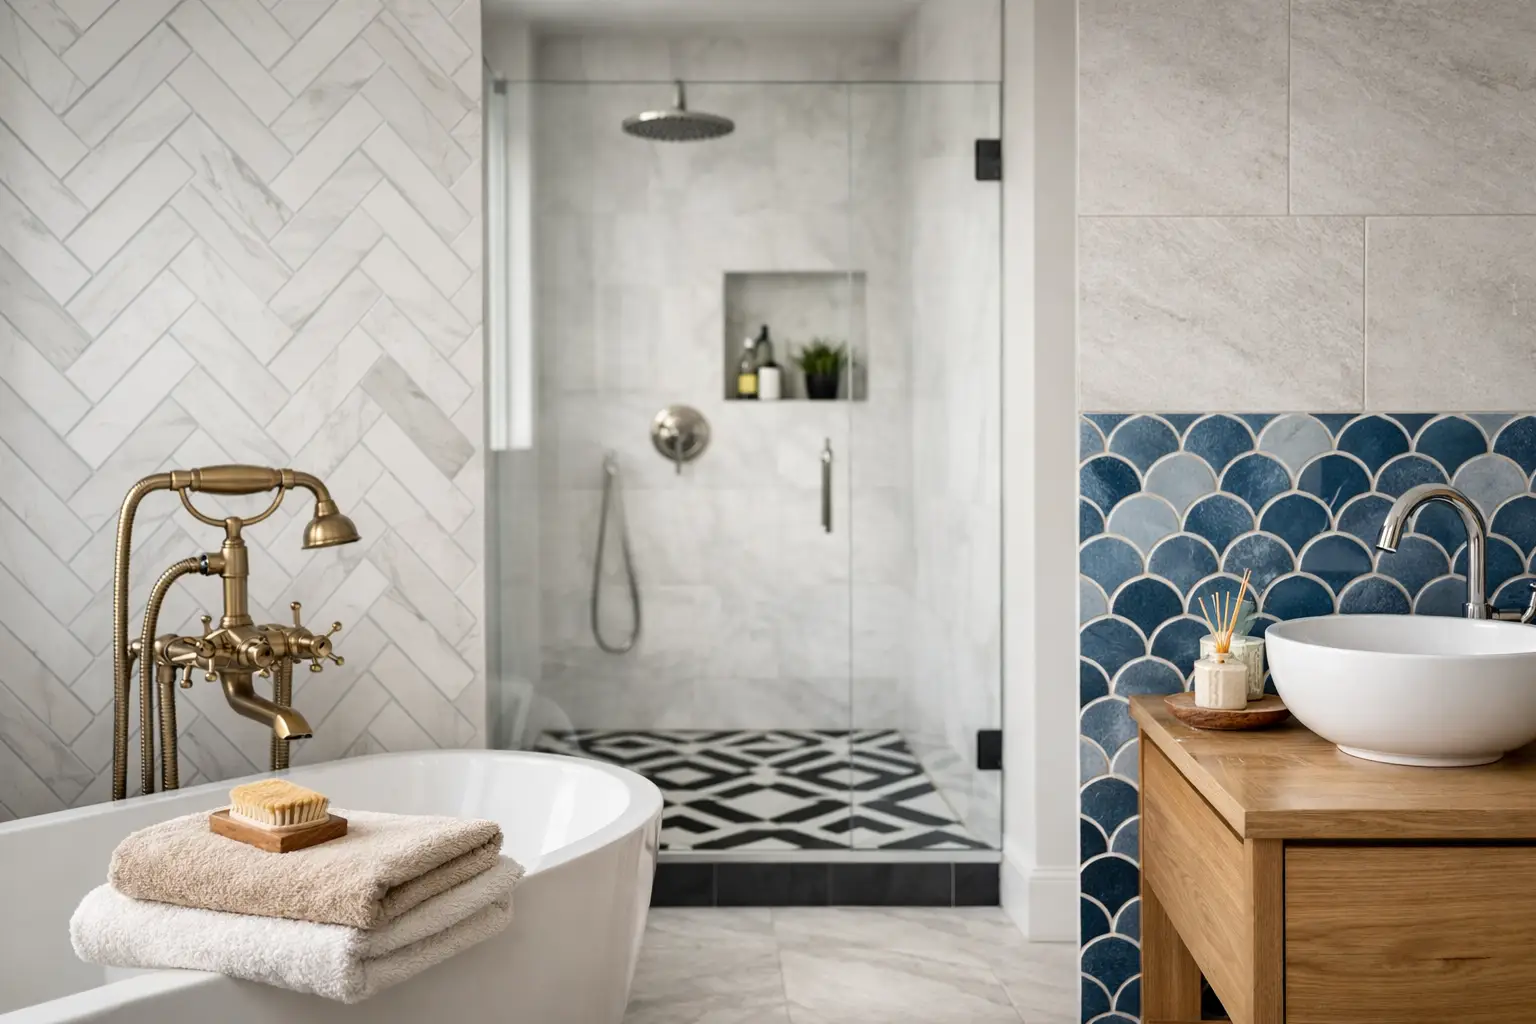
A tile sample can look perfect in the showroom and completely different once it covers a shower wall or bathroom floor. That is why the best bathroom tile patterns are not simply the boldest or most popular. They are the ones that suit the room’s size, natural light, layout, and the way your household uses the space every day.
For a bathroom renovation that feels finished rather than overdesigned, start with the overall effect you want: calm and spacious, warm and traditional, clean and contemporary, or characterful without being busy. The pattern should support that goal while remaining practical to install, clean, and enjoy for years.
Start With Scale, Not the Tile You Love First
Pattern is largely about scale. A layout that works beautifully in a large primary bathroom may feel crowded in a compact hall bath. Likewise, a plain grid can look flat in a generous room if there is no contrast in material, grout, or fixture finish.
Before choosing a pattern, consider the room as a whole. Measure the floor area, wall widths, shower recess, vanity position, window placement, and any niches. These details affect where cuts will fall and whether a pattern can be centered properly. A skilled installer plans these points before tiling begins, rather than trying to solve them after the adhesive is on the wall.
Large-format tiles can make a small bathroom feel less interrupted because they create fewer grout lines. That does not mean small tiles are off-limits. Mosaic, penny round, and kit-kat tiles can add welcome texture in a shower niche, on a feature wall, or as a defined floor zone. The key is to balance them with quieter surfaces nearby.
Best Bathroom Tile Patterns for Everyday Homes
The right pattern depends on your bathroom’s proportions and the level of visual interest you want. These layouts have staying power because they can work across a wide range of home styles.
Straight Lay for Clean, Flexible Design
A straight lay places tiles in aligned rows and columns. It is simple, orderly, and particularly effective with square tiles, large porcelain tiles, or stone-look finishes. In a modern bathroom, a straight lay on walls paired with a larger matching floor tile creates a calm, cohesive result.
Its strength is flexibility. You can make the design feel warmer with a textured tile, soft grout color, timber vanity, or brushed metal fixtures. It also makes sense when the room has several angles, windows, or built-in elements that would compete with a more elaborate layout.
The trade-off is that alignment matters. Uneven walls, poorly planned cuts, or inconsistent grout spacing are more noticeable in a grid pattern. Precision in preparation and installation is essential.
Running Bond for a Relaxed, Classic Finish
Running bond, often called brick pattern, offsets each tile row from the one below. Subway tile is the traditional choice, but the pattern can also suit rectangular porcelain tiles in larger formats.
A horizontal running bond can make a narrow bathroom appear wider, while a vertical version can draw the eye upward and make a low ceiling feel taller. For a timeless shower wall, white or warm off-white subway tile with a soft gray grout remains a reliable choice. A darker grout adds definition but will make the individual tile shape more prominent.
Avoid using a half-offset running bond with long, plank-style tiles unless the tile manufacturer recommends it. Slight natural bowing in long tiles can make lippage, where one edge sits higher than the next, more visible. A one-third offset is often the safer and cleaner-looking option.
Herringbone for a Feature That Feels Intentional
Herringbone creates a repeated V-shaped arrangement that brings movement to a bathroom. It works especially well as a shower feature wall, vanity backsplash, or framed floor section. In the right space, it adds a custom feel without requiring a dramatic color palette.
Because herringbone has more cuts and takes more time to set out, it generally costs more than a straight lay. It also deserves room to be seen. Using it on every wall and floor in a small bathroom can become visually busy, particularly when paired with patterned floor tile or heavily veined stone.
A practical approach is to choose herringbone for one focal area and use a coordinating straight-laid tile elsewhere. This gives the design detail while keeping the room easy to live with.
Chevron for a Sharper, More Formal Look
Chevron resembles herringbone at first glance, but the tile ends are cut on an angle so each point meets cleanly. The result is a continuous zigzag line that feels more tailored and graphic.
Chevron is often best reserved for larger bathrooms or a single statement surface because its directional lines are strong. A neutral porcelain or natural stone look keeps it sophisticated. If you are drawn to a high-contrast chevron, use simpler fixtures and wall finishes so the bathroom does not feel overworked.
Basketweave and Mosaic for Traditional Character
Basketweave mosaic brings period character to heritage-inspired and transitional bathrooms. It is a strong choice for a small floor because the scale can make the room feel detailed rather than plain. Black-and-white basketweave is classic, while softer stone colors offer a more relaxed look.
Mosaic also has a functional advantage in shower floors. The additional grout joints provide better slip resistance than a large, smooth tile. Select grout that is designed for wet areas, and avoid very light grout in high-traffic family bathrooms if keeping it pristine will become a constant chore.
Diagonal Layout for Small or Awkward Rooms
Setting square tiles at a 45-degree angle can make a compact floor appear wider because the eye follows the diagonal lines. It is useful in bathrooms that feel narrow or have an awkward footprint.
This layout requires more perimeter cuts and more planning, so labor and material waste may be higher. It is usually worth considering when the visual improvement is meaningful, but not every room needs it. In a bathroom with a busy vanity, patterned wallpaper, or a heavily detailed shower, a diagonal floor may add too much movement.
Use Grout as Part of the Pattern
Grout is not a background decision. It can either emphasize the layout or let the tile take the lead. Matching grout closely to the tile produces a softer, more continuous surface. Contrasting grout outlines each tile and makes the pattern more pronounced.
For a low-maintenance family bathroom, mid-tone grout is often the sensible choice on floors and shower areas. It hides daily marks better than bright white while still looking clean. On wall tile, a lighter grout can work well if the bathroom has good ventilation and regular cleaning is realistic.
Grout joint width also changes the finished look. Rectified porcelain tiles can be installed with narrower joints, creating a crisp contemporary appearance. Handmade or handmade-look tiles typically need wider joints, which suit their variation and texture. Do not force a narrow, modern joint onto a tile designed to look artisanal.
Match the Pattern to the Bathroom Zone
A bathroom does not need one pattern everywhere. In fact, assigning different layouts to different zones can improve both function and visual order. Use a practical mosaic on the shower floor, a calm large-format tile on the main floor, and a more decorative pattern on the shower back wall or vanity area.
Keep the color family connected so these changes feel deliberate. For example, a warm white wall tile, light stone-look floor tile, and beige mosaic shower floor can create depth without introducing competing colors. Repeating one finish, such as matte black or brushed nickel hardware, helps pull the room together.
If the bathroom is small, limit the number of tile types to two or three. More than that can make the space feel chopped up. Larger rooms can handle additional variation, but every material should have a purpose.
Plan for Cuts, Edges, and Long-Term Maintenance
The most successful tile layouts are planned around the details homeowners may not notice immediately but will see every day. Center a feature wall where possible. Avoid narrow slivers of tile at visible edges. Consider where a pattern begins and ends at a niche, ceiling line, doorway, or vanity.
Tile edges need the same attention. Bullnose, stone trims, metal profiles, and mitred corners each produce a different result. The best option depends on the tile and the style of the room, but it should be selected early, not treated as an afterthought.
Finally, choose finishes honestly. Glossy wall tile reflects light and is easy to wipe down, but it can show water spots. Matte tile is softer and more forgiving, though textured surfaces may need more detailed cleaning. Natural stone can be beautiful, but it may require sealing and more ongoing care than porcelain. A well-planned renovation balances the look you want with the maintenance you are willing to take on.
A bathroom tile pattern should feel right from the doorway and still make sense on a busy weekday morning. Taking the time to plan scale, grout, transitions, and installation details will give you a space that looks carefully made, works hard for your household, and remains a pleasure to use long after the renovation is complete.